Anyway, back to the Picture Perfect class. I learned so many COOL new things to try and share, including easy ways to enhance your photos, many different ways to change to black & white, boosting color, changing to sepia, antiquing, and more.
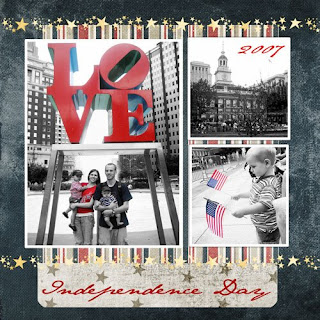
What I'm focusing on in this post is COLOR SPOTTING - how to get one part of a black and white photo to show color, as seen in this layout:

I'm going to explain how to do this but bear with me, I'm not always the best at explaining things, and it's still new to me ;)
1. Open your color photo, and do any editing you like.
2. Create a new adjustment layer. **This was a brand new thing for me** See the little icons at the top of your layers palette? On the far left you should see a small white square that looks like a piece of paper, and next to that is a circle - half black, half white. Click on the circle, and a drop down menu should appear.
3. From the list, click "gradient map."
4. A new window will open, with a black and white rectangle. Click on the the little arrow to the right of the rectangle and select the "black, white" square (third from the left).
5. Click ok. What you have created is a "black & white gradient map". Your photo should now look black & white.
6. Select your brush tool from your toolbox. From your options bar at the top of the screen, select a simple round brush.
7. Make sure your brush color is set on black. To do this go to the little square on the bottom of your toolbox (bottom left corner of your screen.) If the box on top is already black, perfect. If not, click on the box and new window will open. From the color box select a black section and click ok.
8. NOW - click your brush over the areas you want in color. It may be useful to zoom in close so that you can be very precise.
**If you mess up... just change you brush color to white and go back over the areas you want to fix - they will return to black & white. Basically, when you are working on a black & white gradient layer black means "NO (not black & white anymore!)" and white means "YES".
9. Once you have finished working on your gradient map adjustment layer, and your look is complete, merge the two layers. (Hold down your Ctrl key while clicking on both layers. Then right click on the layers and select "merge layers".)
So... I really really hope this makes sense for anyone who wants to try it. If you have any questions please feel free to email me or use the comments. My email address is lynnettelebaron at hotmail dot com, and it's also posted in my sidebar.
Join me for the next DSM advanced class on April 19, also focusing on photo editing! The class will cover things like teeth whitening, taking out distracting things in a background, switching heads (when the kiddos just won't cooperate) and MORE! (Alisha is an amazing teacher.)
{paper by Gina Cabrera's "Virtual Ink" CD, stars by Miss Mint at Peppermint Creative, "Jane Austen" font}

4 comments:
Lynnette! You are sooo good!! I LOVE what you did with this layout. If I can get just the teeniest bit of your style and talent with scrapbooking I would be in heaven!
I cannot even tell you how excited I am about trying this! I've been trying for a while to figure it out somehow and now I can!!! Thank you so much for sharing and I want to take the next class with you! You'll have to let me know where I need to go and do. Thanks!
Thanks! That was the perfect tutorial. I love it! I am a beginner and it was very well explained.
Hey-I came back to this post since I can actually maneuver a little bit around photoshop now :) and I totally was able to do it thanks to your instructions!! THANKS! And I want to copy your family picture in front of the LOVE...would that be ok?
Post a Comment